Tutorial
By: Patricia Gonzalez Guerrero
Let’s generate a small system with four tiles. All the tiles are equal and have a RISCV processor with an ISA extension for message queues (qISA). To generate this system we will:
- Create a testcase
- Generate the configuration files
- Run a simulation using i-verilog or Vivado
- Check the simulation results.
Looking for IP creation / bitstream generation?
1. Create the testcase
Go to doc/tutorial_files/testcases/ and copy mosaic_tutorial_0.pl over to tools/generate. All testcases have three sections: header, user, and footer. The header and footer shouldn’t need modifications for basic functionality. In the user section, we set all the configurations for MoSAIC. The minimum configuration for a functional mosaic is set by the following parameters:
#- Set the number of rows (r) and columns (c) in MOSAIC array.
$param{'r'} = 2;
$param{'c'} = 2;

#- Set the type for each tile
@tile_array = (['pico', 'pico'],
               ['pico', 'pico']);

#- Set the firmware to load in each scratchpad
@pico_program  = ('test_tile_nop.hex', 'test_tile_nop.hex',
'test_tile_nop.hex', 'test_tile_nop.hex');
There are parameters to control simulation features. In this case we can set ‘run_sim’ to launch a simulation after creating all the configuration files.
$param{'run_sim'} = 1;
2. Create stimulus
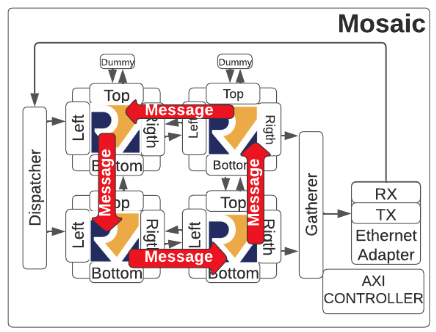
Let’s create a program that passes a message counter-clockwise and each tile increments the data by 1. Go to doc/tutorial_files/c_step1 and open the file send_msg.c.
Each tile has an identification number or coordinate (tile_id) in (y,x) format, with column (y) and row (x). To represent x/y positions in the array we use 3 bits for a total of 6 bits for the coordinates. For our example, the corresponding tiles ids are:
| Column 0 | Column 1 | |
|---|---|---|
| Row 0 | 000-000 (6’h0) | 001-000 (6’h8) |
| Row 1 | 000-001 (6’h1) | 001-001 (6’h9) |
Include the “mq.h” header in the c code. This header enables the access to the qISAextension through the functions qPut(), qGet(), qPoll(),qWait(), mPut(), mGet(). We will use these functions during the tutorial and explain what these are for in context.
A little detour. Let’s take a look at the Tile_picorv tile. In this tile, we have an ISA extension that connects a hardware message queue with the RISCV such that we can use the software primitives mentioned above.
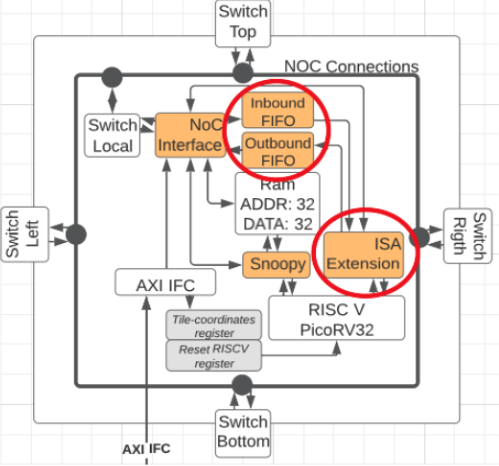
For the C code, we assume all the RISCV processors are running the same program and do different things, or use different data depending on the tile_id.
Thus, the first task is to ask who am I? What is my tile_id? As shown below. For this, we also include the stdlib library which includes among others the atoi function.
#include <stdlib.h>
#include "mq.h"
#include "wrapper_mq.h"

void main (int argc, char *argv[]) {
    int tile_id = atoi(argv[1]);
If the tile_id is (0,0) we start the game by sending the first message using the qPut(destination_tile, data) function. This will generate a packet originating from tile_00 which destination is a physical hardware queue placed at tile (0,1).
if (tile_id == 0) {
  qPut(1, 1);  // qPut(dest, data)
}
We will make the processors wait until they have a message in the queue using the qWait(unused, data) function. The data variable contains the first message in the queue, in this case we place it in the variable temp.
qWait(0,temp);
Once there is something in the queue, the processor continues. We use w_qGet(unused, data) to pop the data belonging to the first message out of the queue. This will be stored in the variable ball.
w_qGet(0,&ball);
Once it gets the ball, we can send a new message to the neighboring tile using qPut(destination_tile, data). In that case, we increment ball by one before sending it. Lastly, the destination for the message depends on the local tile_id.
/* Set the neighbor */
if      (tile_id == 0) {dest_tile = 1;}
else if (tile_id == 1) {dest_tile = 9;}
else if (tile_id == 9) {dest_tile = 8;}
else if (tile_id == 8) {dest_tile = 0;}

/* Send it to the neighbor */
qPut(dest_tile,ball+1);
The complete code looks like this
#include <stdlib.h>
#include "mq.h"
#include "wrapper_mq.h"
void main (int argc, char *argv[]){
   int tile_id = atoi(argv[1]);
   int dest_tile;
   uint32_t ball;

   if (tile_id == 0) {
     qPut(1, 1);       // qISA
   }
   qWait(0,temp);      //qISA
   w_qGet(0,&ball);    //qISA
   if      (tile_id == 0) {dest_tile = 1;}
   else if (tile_id == 1) {dest_tile = 9;}
   else if (tile_id == 9) {dest_tile = 8;}
   else if (tile_id == 8) {dest_tile = 0;}
   qPut(dest_tile,ball+1); //qISA
}
Use the send_msg.pl script to generate the hex files for all the RISCVs. In the directory there will be send_msg32_<tile_id>.hex files, one per tile in the array.
Modify the testcase
First, add the path where the hex files are, or copy the hex files to the default location. Then, add the new hex files using the @pico_program array. Finally increase the simulation time and re-launch the testcase.
$param{'firmware_path'} = <set_me>;
@pico_program  = ('send_msg32_0.hex', 'send_msg32_8.hex',
                  'send_msg32_1.hex', 'send_msg32_9.hex');
#- Simulation Time
$param{'sim_loop'} = 140;
For the firmware path use an absolute path.
Check the simulation results
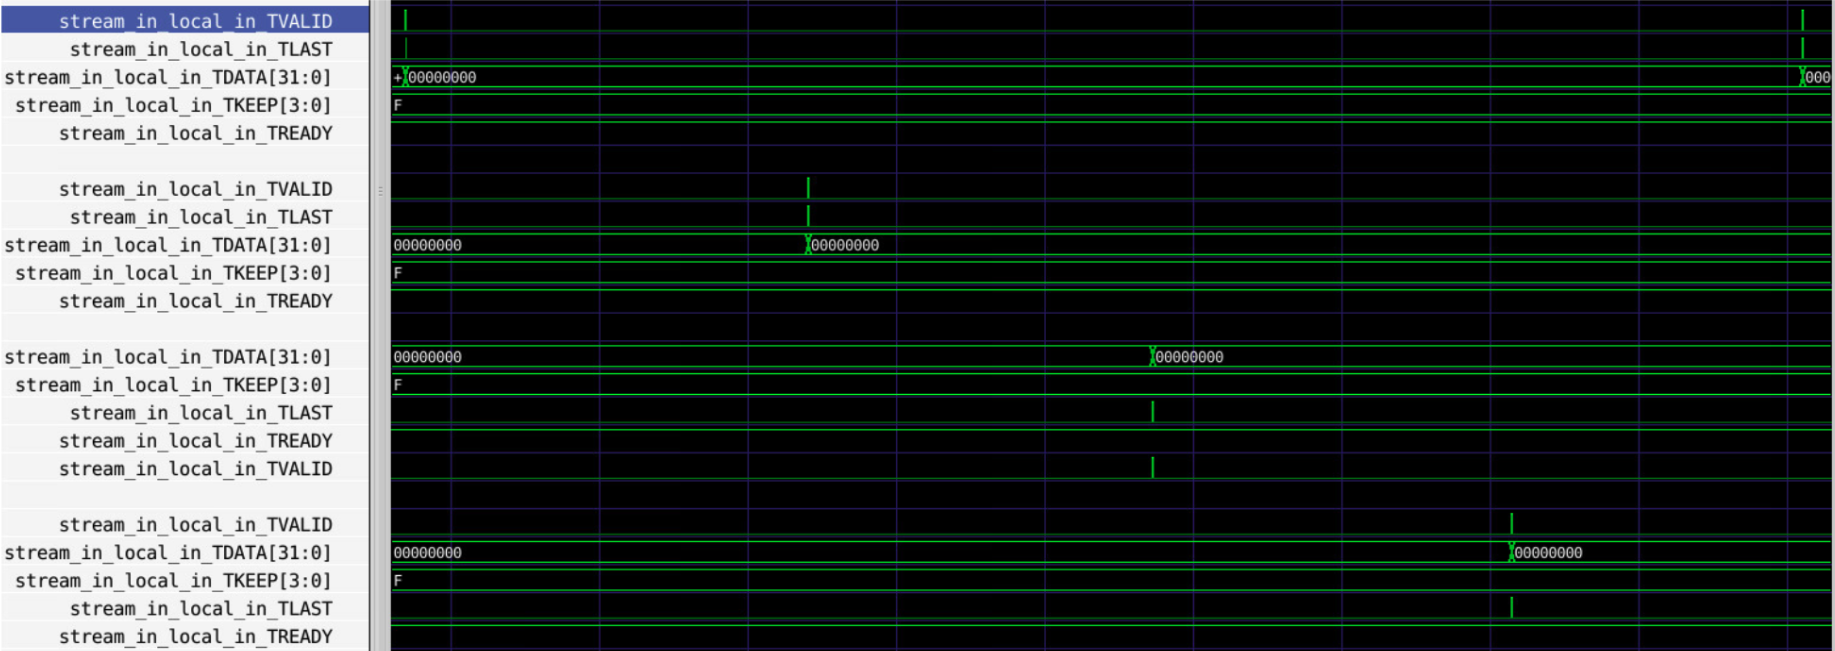
Go to each tile and add the stream_in_local_in_T<> signals which are the connection between the tile logic and the NoC. the diagram below shows the packets coming out of each tile as they pass the ball. If you zoom in the two packets generated at tile_00, the data for the first one is 1 (which initiates the transactions) and for the last one, the data is 5 which is the accumulated data as the message passes through the tiles.
Replacing RISC V for accelerators
The Github repository has two other types of tiles. The Tile_scratchpad contains a SRAM based scratchpad that can be read/write from/to any other tile through the NoC. The Tile_loop is a dummy tile and sends the message back as it is to its source. All Tiles are expected to have the same interface to be integrated in MoSAIC.
To replace some of the RISCV processors with these tiles we need to modify the testcase. Use @tile_array to set the type of tile that you want at each place, and @pico_program to load data in the scratchpad and leave it empty for the loop tile, since this one does not have nay memory.
 @tile_array = (['pico', 'spad'],
                ['loop', 'pico']);
 @pico_program  = ('send_msg32_0.hex', 'test_tile_nop.hex',
                                  '', 'send_msg32_9.hex');
Modify the C code to continue sending packets between the RISCVs, generate the hex files and execute the testcase and check gtkwave to see the spad and the loop tiles as part of the array.