OpenNIC Shell
Packing the MoSAIC IP
- Open design sources In the Vivado project.
- Set
mosaic(insidetb_mosaic) as the top level file. - Go to Tools → Create and Package new IP.
- Set the name as USS and the version as 2.0.
Putting the goodies inside open-nic-shell-lbnl
- In a new directory, clone this repo
- Inside,
mkdir newly_created_IP. Copy these files from MoSAIC into this directory:
open-nic-shell-lbnl/
├─ newly_created_IP/
│  ├─ component.xml/
│  ├─ build/
│  ├─ src/
│  ├─ xgui/
├
Setting up for implementation
Building the project
In script/, run:
vivado -mode batch -source build.tcl -tclargs -board au250 -jobs 8
Pick one of two options below. Both do the same thing, one is through the GUI and the other is through the helper scripts (see helper_notes/building_new_vivado_project_README.md)
Generating the IP
Option 1: helper scripts
Notice the following section in all_at_once_2022_2.tcl. Replace ipi_2022_2 with newly_created_IP.
It should look like this:
# adding the ipi_xx/ to the Repositories  (example IP, replace with your own)
set_property  ip_repo_paths  $project_path/../../../newly_created_IP [current_project]
If you are using DRAM, uncomment this section:
# adding memory controller & defining ddr4
source $project_path/../../../helper_scripts/memory_ctrl_etc_2022_2.tcl
update_compile_order -fileset sources_1
source $project_path/../../../helper_scripts/sync_ddr4_ctrl.tcl
update_compile_order -fileset sources_1
Ready to run!
source helper_scripts/all_at_once_2022_2.tcl
If you’re brave, uncomment the last two lines to generate the bitstream.
Option 2: GUI
Open your vivado project:
vivado ~/<your project location>/open-nic-shell-lbnl/build/au250/open_nic_shell/open_nic_shell.xpr
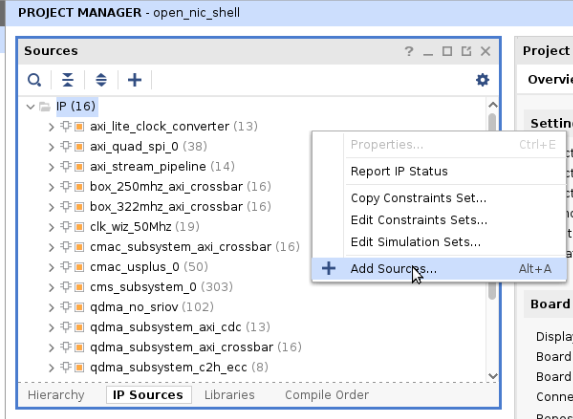
- Open IP sources. Right click and open Add Sources.
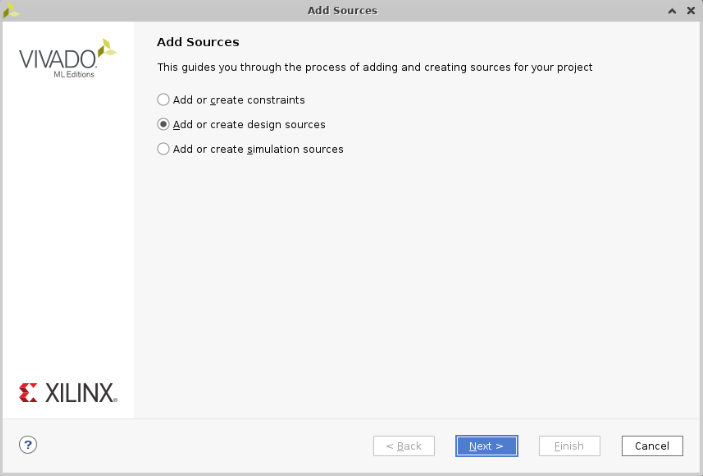
- Click next. Proceed to adding your
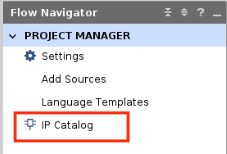
newly_created_IPdirectory. - Go to the project manager. Click on IP Catalog.
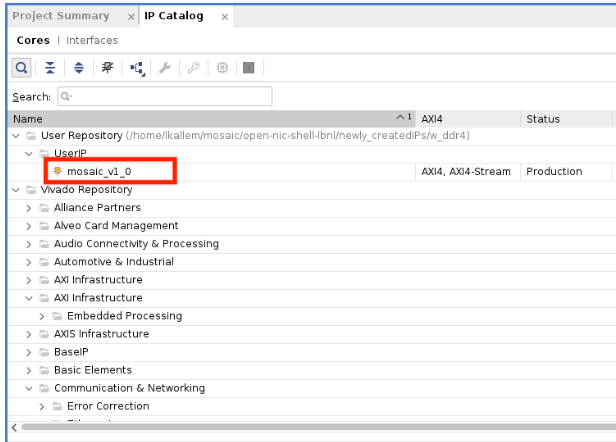
- Find your IP. Double click on it.
-
If using DRAM,
cd helper_scripts/and run the scripts below:source memory_ctrl_etc_2022_2.tcl source sync_ddr4_ctrl.tcl - Run implementation.
- Generate your bitstream.
Scroll down for the FPGA programming tutorial!
Visual Guide for steps 1-4
Programming the FPGA
The fun part!
Note
This tutorial assumes you are using the U250. If you are using the U280, you should be able to follow this tutorial by just replacing “U250” with “U280” in the commands run below.
Before moving on, let’s grab our bitfile from our OpenNIC Shell clone:
cp build/au250/open_nic_shell/open_nic_shell.runs/impl_1/open_nic_shell.bit ~/<your MoSAIC location>/shell/fpga/u250_bit/
Moving back to our MoSAIC clone…
If you have multiple bitfiles you want to test, you can choose which one you’d like by changing line 39 in program_card.tcl.
set bit_file "./${board}_bit/open_nic_shell.bit"
Then, run the following script
Note
- You may need to edit the script according to your system.
- If you are using the U280, be sure to update the board flag on line 38.
./for_programming_fpga.sh