Adding New Accelerators
By: Patricia Gonzalez Guerrero
In the tutorial document there are two dummy accelerators (acc1, acc2) located in doc/tutorial_files/acc1(2)_tile.
5.1. Add the accelerators to the generation tool
Copy doc/tutorial_files/mosaic_tutorial_3.pl to /tools/generate. This testcase adds a new section to add the accelerators to be instantiated as part of MoSAIC. We need to add the verilog module for the Tile and assign it an alias. For example the Tile_picorv alias is pico, the Tile_scratchpad alias is spad and the Tile_loop is loop.
#- Create structure to hold new types of tile (Needed)
%new_tile;

#- Pair the verilog module with an alias for each new tile (User)
$new_tile{'acc1'} = 'Tile_acc1';
$new_tile{'acc2'} = 'Tile_acc2';

#- Add it to the parameters (Needed)
$param{'new_tile'} = \%new_tile;
5.2. Add the accelerators to the array
Similarly to the previous step, use @tile_array to set the type of tile, and @pico_program to load data in the tiles. Set an array with 2 rows and three columns and add acc1 and acc2 in the new column. The testcase looks like this:
$param{'r'} = 2;
$param{'c'} = 3;

@tile_array = (['pico', 'spad', 'acc1'],
               ['loop', 'pico', 'acc2']);

@pico_program  = ('send_msg32_0.hex', 'test_tile_nop.hex', '',
                                   '', 'send_msg32_9.hex',  '');
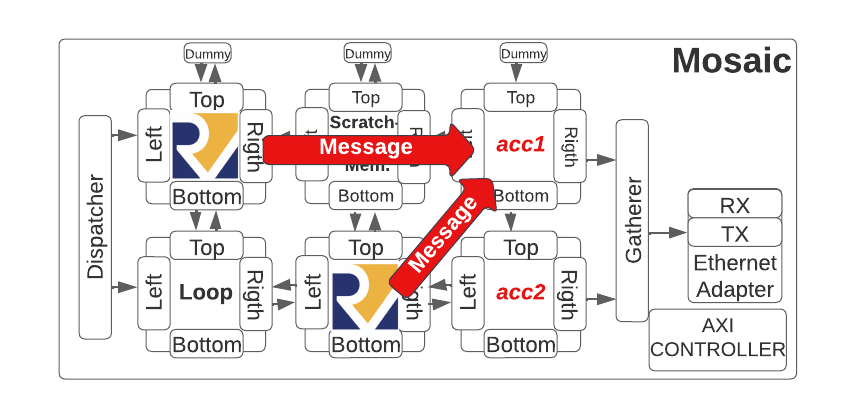
5.3. Add the source files
For icarus open icarus/file_list.txt and add the verilog source files:
../doc/tutorial_files/acc1_tile/Tile_acc1.sv
../doc/tutorial_files/acc1_tile/acc_acc1.sv

../doc/tutorial_files/acc2_tile/Tile_acc2.sv
../doc/tutorial_files/acc2_tile/acc_acc2.sv
5.4. Create the stimulus
The tile_ids for this example are:
| Column 0 | Column 1 | Column 2 | |
|---|---|---|---|
| Row 0 | 000-000 (6’h0) | 001-000 (6’h8) | 010-000 (6’h10) (6’d16) |
| Row 1 | 000-001 (6’h1) | 001-001 (6’h9) | 010-001 (6’h11) (6’d17) |
There are several ways to send/receive packets from the RISCV to the different tiles. We can use the qPut function as explained before. Also, some accelerators benefit from using long packets.
5.4.1. Long packets using qPut
The code below is an example of how to create a packet with a 64 bit header (two 32 bit words) and 8 words (256 bits) in the payload. Use qPutH(destination_tile, packet_size_code) to create the packet header. Use qPutD(data1, data2) to add data to the payload 64 bits at a time (2 words of 32 bits).
qPutH(dest_tile,3); //qPutH(dest,pkt_size), 2^3=8 words in payload
for (int i=0; i<4; i=i+1){
  qPutD(data1, data2);
  data1 = data1 + 1;
  data2 = data2 + 1;
}
5.4.2. Non-blocking memory Put (mPut)
Set the dest_tile and the offset within the tile to write to a memory mapped location. For example, in the scratchpad tile this writes to address 1024 in the sram.
/* w1_mPut(data, dest_tile_id, offset) */
w1_mPut(data1, dest_tile, 1024);
Let the compiler decide where the data is. Define the variables and assign them to the accelerator address space.
uint32_t data2_acc1 __attribute__ ((section(".myacc1")));
...
w2_mPut(data1,&data2_acc1);
5.4.3. Store (blocking)
Just assign a value to a variable that was defined in the accelerator address space.
...
uint32_t data1_acc1 __attribute__ ((section(".myacc1")));
...
data1_acc1 = 0xbeefbeef
5.5. Long Packets
General long header (64 bits):

qPut long packet:

mPut long packet:

mGet and DMA long packet:
